
QNX
One of the partner projects of Ferrocene is QNX, an embedded real-time OS commonplace in automotive, medical applications, automated manufacturing, trains, and more.
This page contains the information relevant to Ferrous Systems employees working on Ferrocene.
Note
QNX only supports x86-64 Linux (glibc) and x86-64 Windows as host platforms.
QNX does not support Apple Silicon macOS as a host platform.
First, ensure you have a myQNX account and that a QNX Software Development Platform Subscription - Developer License is deployed to it.
QNX Software Development Platform
Windows Setup
Download the QNX Software Center for Windows and run it.
An InstallShield installer will run as administrator. Choose a location
to install QNX, we use D:\qnx for the rest of this guide.
Note
If you are uncomfortable with the Windows GUI, you may instead
follow the Linux instructions (with minor modifications) below using the
D:\qnx\QNX Software Center\qnxsoftwarecenter_clt.bat in place of
qnxsoftwarecenter_clt.sh in Powershell, Nushell, or cmd.exe.
After, you can launch the “QNX Software Center” application from the Start Menu.
Linux Setup
Download the QNX Software Center for Linux. In the
below example, the downloaded .run file has been saved as
$HOME/qnx-software-center.run
cd $HOME
chmod +x qnx/qnx-software-center.run
qnx/qnx-software-center.run --tar xvf -C qnx
QNX 7.1.0
Windows (QNX 7.1.0)
Launch “QNX Software Center”, log in, if prompted.
Select “Add Installation…”.
Expand the “QNX® Software Development Platform 7.1” section.
Select “QNX® Software Development Platform 7.1” and ensure the version is “Stable (7.1 BuildID 472)”, you may need to uncheck “Show Only Latest Version” at the bottom of the window:
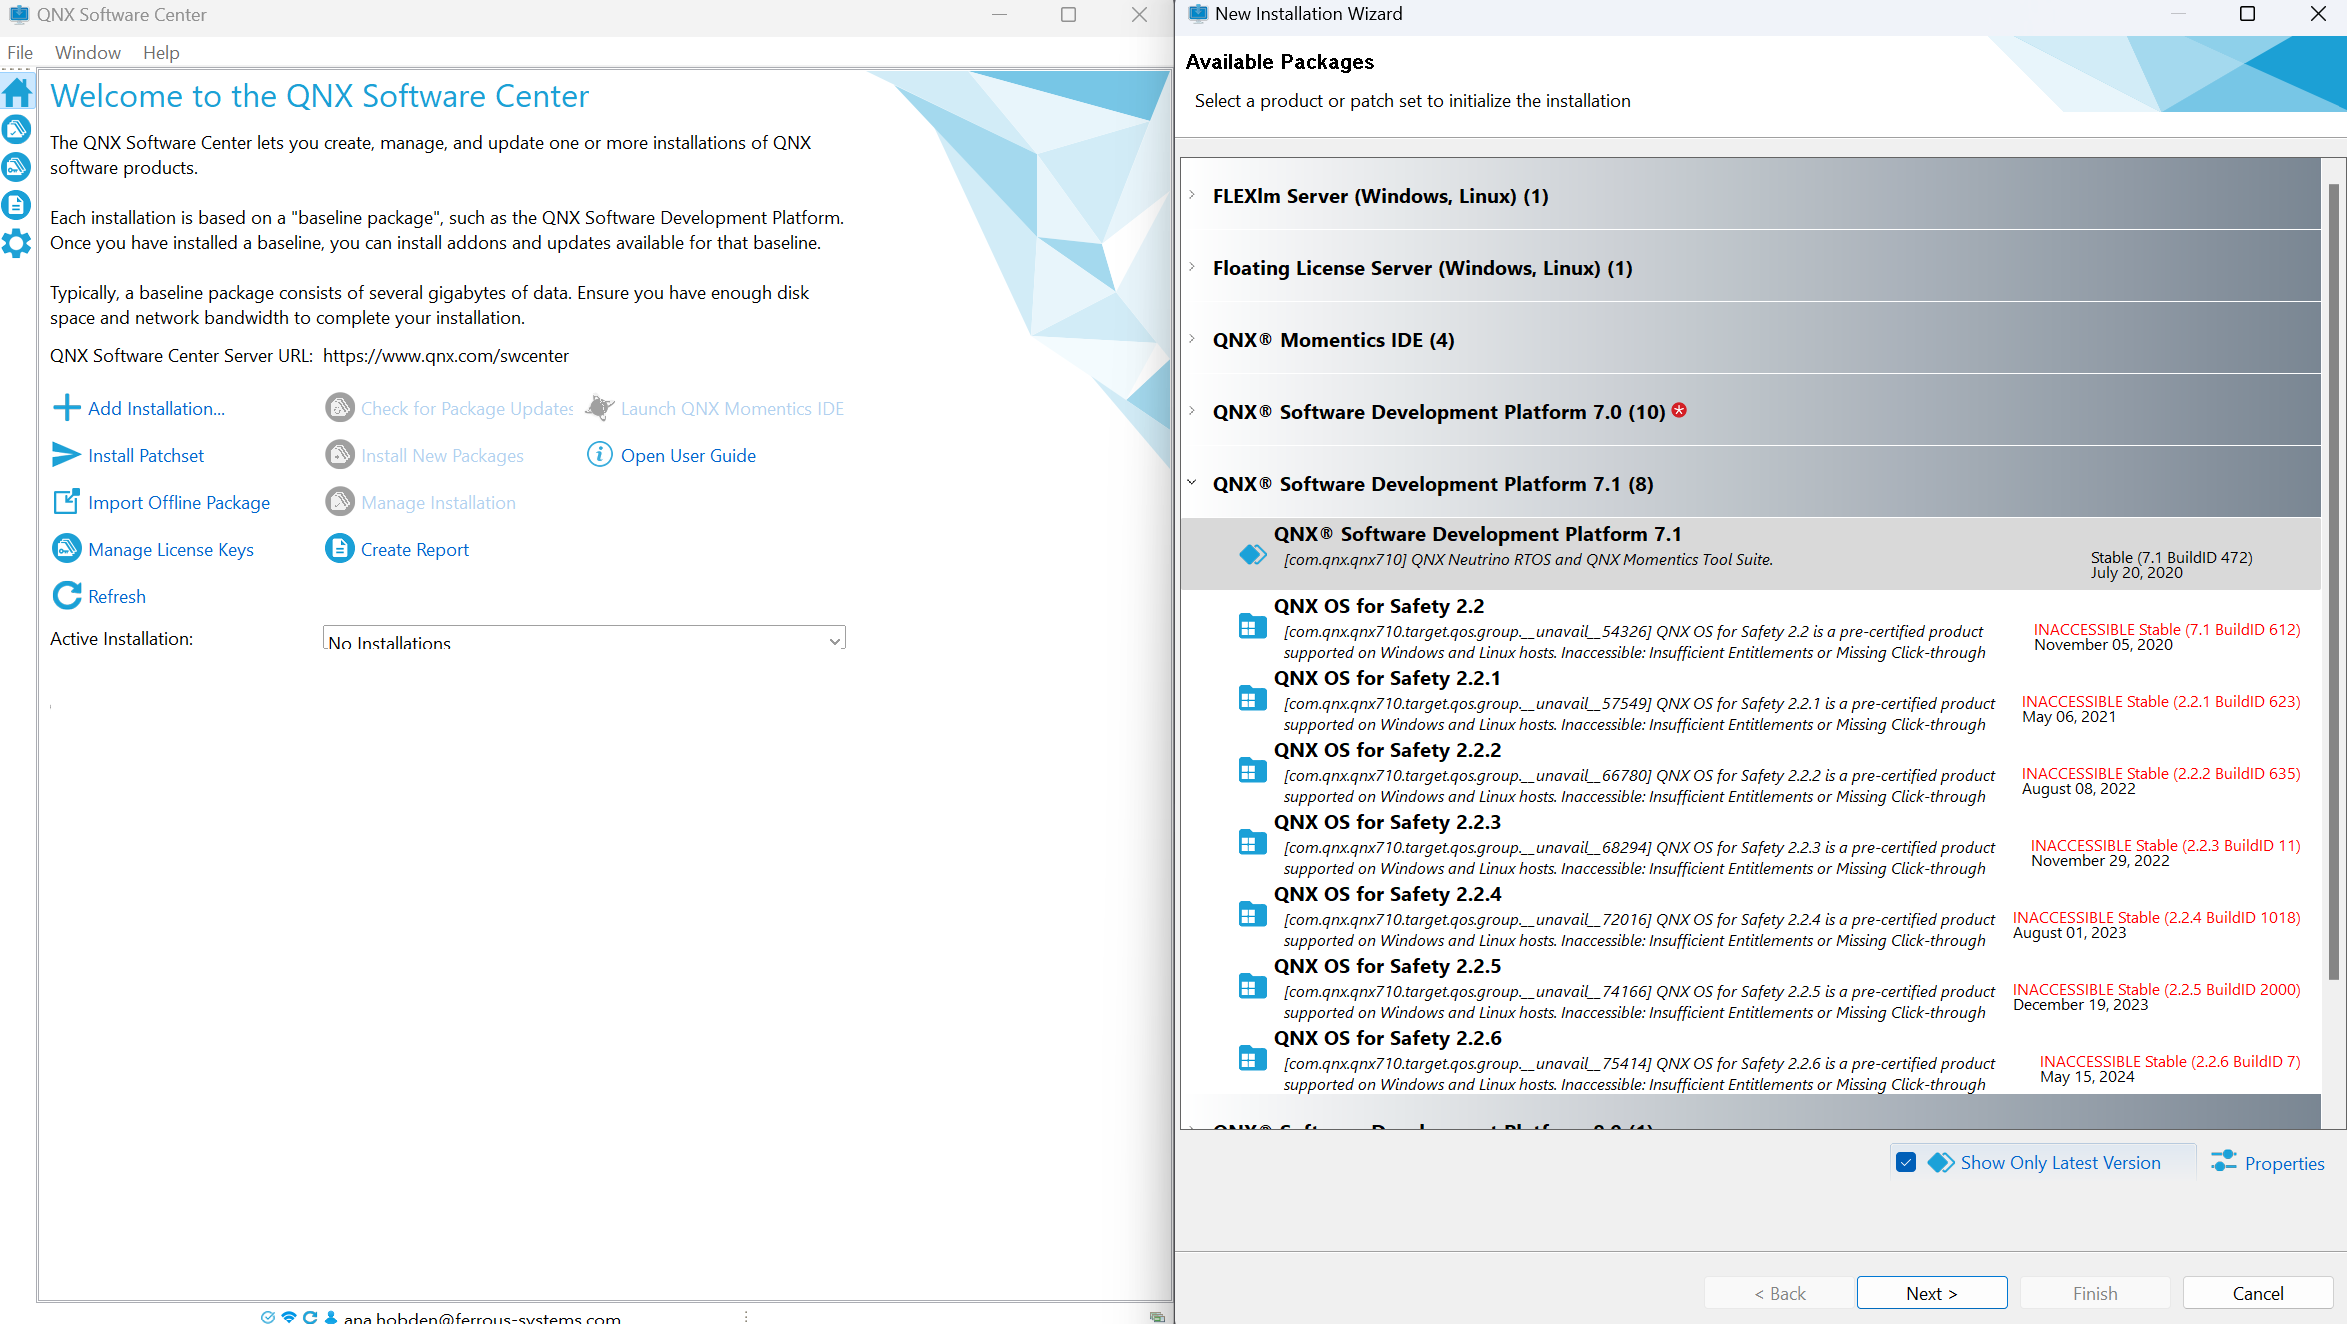
QNX SDP Installation
The software will now prompt you to select a license key, select the previously deployed QNX Software Development Platform Subscription - Developer License.
Choose an installation folder, we use D:\qnx\qnx710 for the rest of this
guide.
In the “Install” screen, “QNX® Software Development Platform 7.1” should be selected. Hit “Next >”, then hit “Finish”.
QNX Software Center will now download the toolchain. A summary will be produced after, dismiss it when you are satisfied.
Your installation will be located in the installation folder you chose.
For example, D:\qnx\qnx710.
Linux (QNX 7.1.0)
Note
If you are uncomfortable with the Linux command line, a GUI is available. You may instead run ./qnx/qnxsoftwarecenter/qnxsoftwarecenter and follow the Windows instructions above, starting from “Log in, if prompted” now.
Install QNX 7.1.0 BuildID 472:
LICENSE_KEY="FILL_ME_IN"
QNX_USER="FILL_ME_IN"
QNX_PASSWORD="FILL_ME_IN"
QNX_VERSION="7.1.0.00472T202006132107S"

cd $HOME/
qnx/qnxsoftwarecenter/qnxsoftwarecenter_clt \
    -myqnx.user $QNX_USER -myqnx.password $QNX_PASSWORD \
    -activateLicenseKey $LICENSE_KEY
qnx/qnxsoftwarecenter/qnxsoftwarecenter_clt \
    -myqnx.user $QNX_USER -myqnx.password $QNX_PASSWORD \
    -mirrorBaseline qnx710-472
qnx/qnxsoftwarecenter/qnxsoftwarecenter_clt \
    -myqnx.user $QNX_USER -myqnx.password $QNX_PASSWORD \
    -installBaseline com.qnx.qnx710/$QNX_VERSION \
    -destination qnx/qnx710-472 \
    -cleanInstall
Finally, you can source your QNX toolchain in bash:
cd $HOME/
source qnx/qnx710/qnxsdp-env.sh
qcc
If everything is working, the output of qcc should be:
$ qcc
cc: no files to process
Note
You need to source this in any shell you wish to use QNX in. You may wish
to add source $HOME/qnx/qnx710/qnxsdp-env.sh to your ~/.bashrc
CI/CD deployment (QNX 7.1.0)
Note
These instructions are intended to be run on a x86_64 Linux host only. WSL2 or Lima work sufficiently if needed.
QNX artifacts are built using a ‘deployment’ of QNX which contains a license provided by QNX for our CI/CD.
Warning
This license may not be used for individual development. Ferrocene also has several individual licenses available for developers. To obtain one, ask your manager.
To create the deployment, first, ensure you are using a myQNX account with a QNX Software Development Platform Subscription - Build Server License deployed to it.
Create a deployment containing Linux and Windows toolchains:
LICENSE_KEY="FILL_ME_IN"
QNX_USER="FILL_ME_IN"
QNX_PASSWORD="FILL_ME_IN"
QNX_VERSION="7.1.0.00472T202006132107S"
QNX_HOST_VERSION="0.0.2.00472T202006132107S"
QNX_BSP_VERSION="0.0.3.00010T202012081457E"

qnx/qnxsoftwarecenter/qnxsoftwarecenter_clt \
    -myqnx.user $QNX_USER -myqnx.password $QNX_PASSWORD \
    -activateLicenseKey $LICENSE_KEY
qnx/qnxsoftwarecenter/qnxsoftwarecenter_clt \
    -mirrorBaseline qnx710
qnx/qnxsoftwarecenter/qnxsoftwarecenter_clt \
    -installBaseline com.qnx.qnx710/$QNX_VERSION \
    -installPackage com.qnx.qnx710.host.win.x86_64/$QNX_HOST_VERSION \
    -installPackage com.qnx.qnx710.host.linux.x86_64/$QNX_HOST_VERSION \
    -installPackage com.qnx.qnx710.bsp.xilinx_xzynq_zcu102/$QNX_BSP_VERSION \
    -destination qnx/qnx710-472 \
    -cleanInstall
qnx/qnxsoftwarecenter/qnxsoftwarecenter_clt \
    -deploySdpInstallation qnx/qnx710-472 \
    -deployLicense $LICENSE_KEY \
    -installationDeployAs qnx/qnx710-472-deployment
Finally, create an archive of the deployment (with dereferenced symlinks) and upload it to the S3 URL which the CI attempts to pull from:
cd $HOME
tar -cv --dereference -I 'zstd -T0' -f qnx/qnx710-472-deployment.tar.zst -C qnx/qnx710-472-deployment/ qnx710-472
aws s3 cp qnx/qnx710-472-deployment.tar.zst s3://ferrocene-ci-mirrors/manual/qnx/qnx710-472-deployment.tar.zst
On CI/CD hosts we use a Python script to setup the toolchain:
cd $HOME
ferrocene/ci/scripts/cache.py retrieve s3://ferrocene-ci-mirrors/manual/qnx/qnx710-472-deployment.tar.zst .
source qnx/qnx710-472/qnxsdp-env.sh
qcc -v
It’s also possible to use tar directly, but it can be problematic on Windows hosts.
cd $HOME
aws s3 cp s3://ferrocene-ci-mirrors/manual/qnx/qnx710-472-deployment.tar.zst - | tar -x --zstd -f-
source qnx/qnx710-472/qnxsdp-env.sh
qcc -v
QNX SDP 8.0.5
Windows (QNX SDP 8.0.5)
Launch “QNX Software Center”, log in, if prompted.
Select “Add Installation…”.
Expand the “QNX® Software Development Platform 8.0” section.
Select “QNX® Software Development Platform 8.0.5” and ensure the version is “Stable (GA 8.0.5)”:
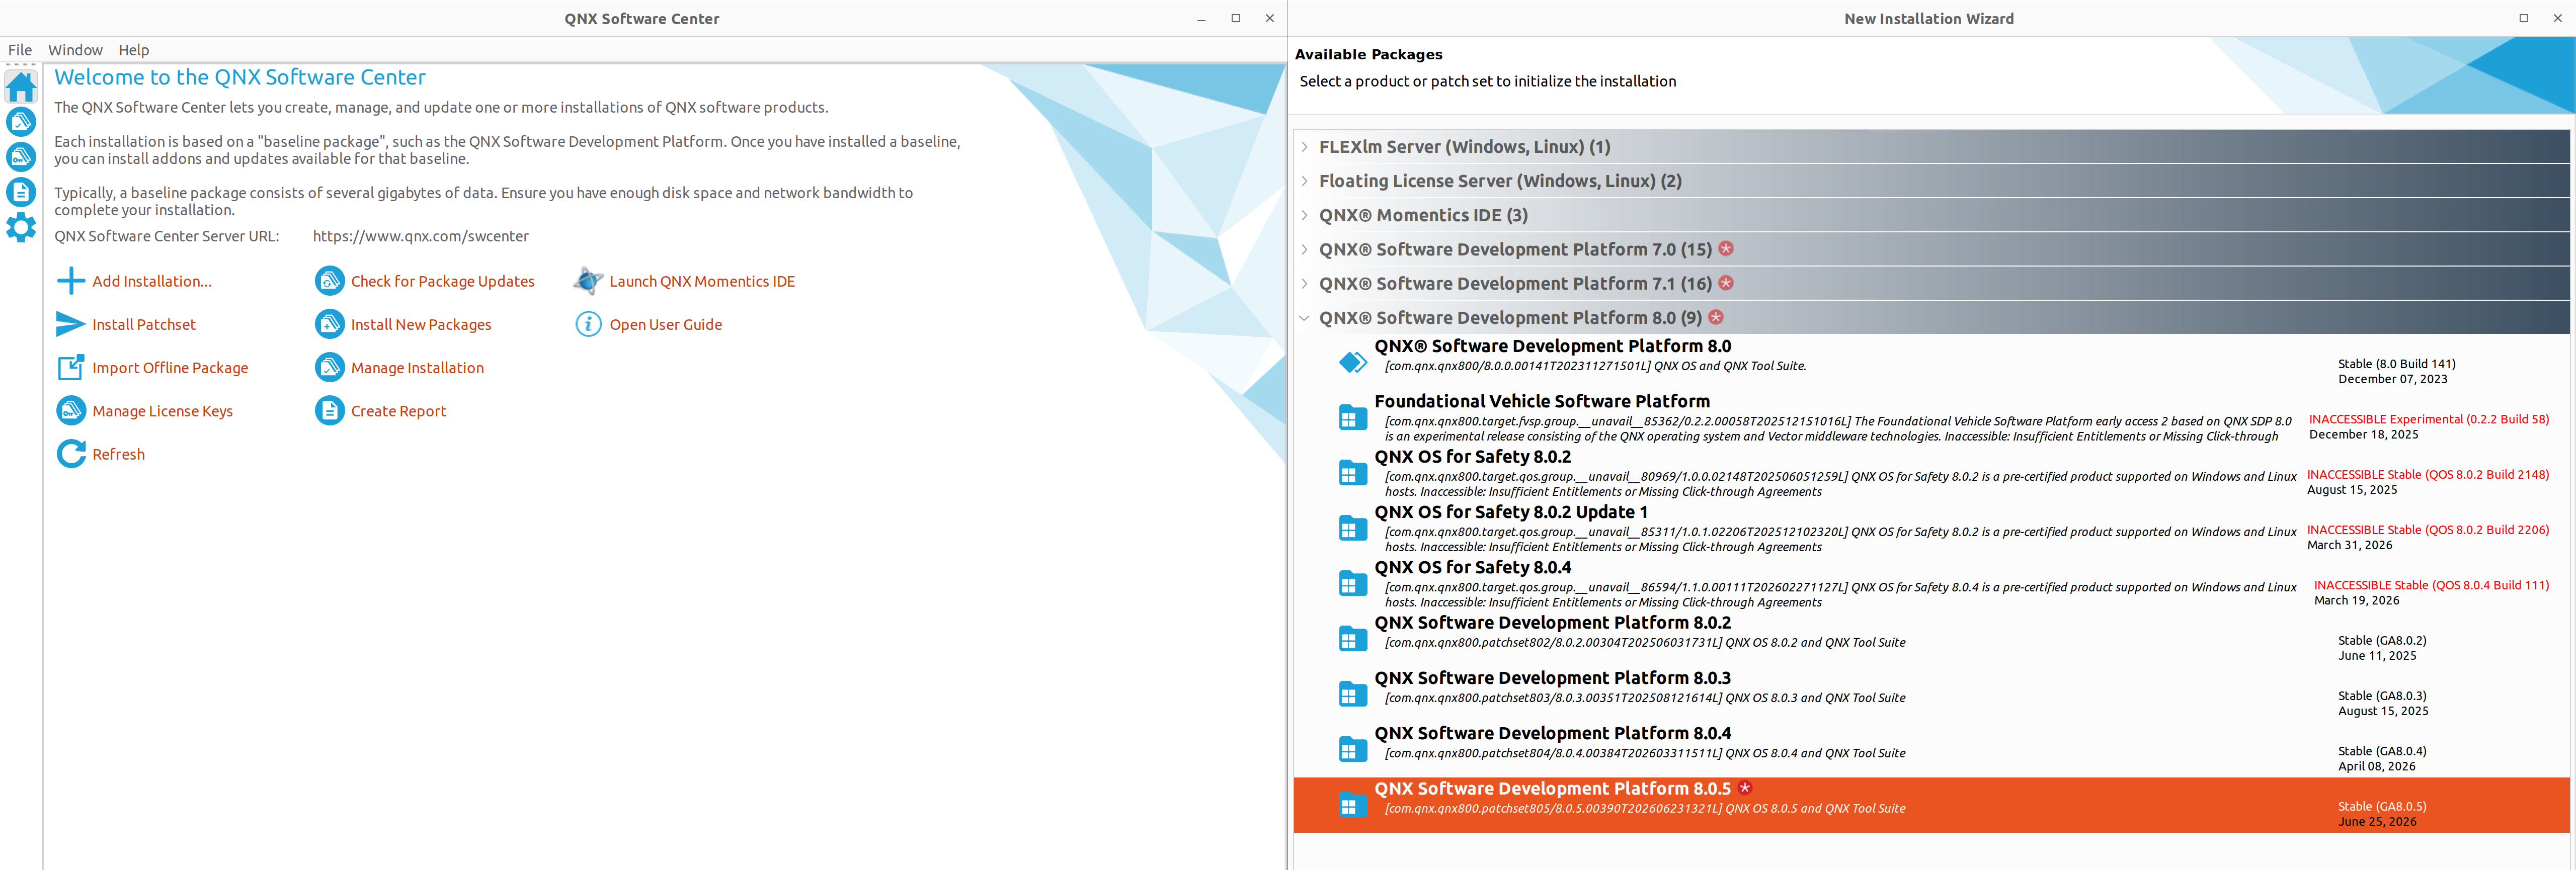
QNX SDP Installation
The software will now prompt you to select a license key, select the previously deployed QNX Software Development Platform Subscription - Developer License.
Choose an installation folder, we use D:\qnx\qnx800 for the rest of this
guide.
In the “Install” screen, several packages of different GA versions will be listed but the newest GA version should not be higher than 8.0.5. Hit “Next >”, then hit “Finish”.
QNX Software Center will now download the toolchain. A summary will be produced after, dismiss it when you are satisfied.
Your installation will be located in the installation folder you chose.
For example, D:\qnx\qnx800.
Linux (QNX SDP 8.0.5)
Note
If you are uncomfortable with the Linux command line, a GUI is available. You may instead run ./qnx/qnxsoftwarecenter/qnxsoftwarecenter and follow the Windows instructions above, starting from “Log in, if prompted” now.
Install QNX SDP 8.0.0 BuildID 141 along with patchset 8.0.5:
LICENSE_KEY="FILL_ME_IN"
QNX_USER="FILL_ME_IN"
QNX_PASSWORD="FILL_ME_IN"
QNX_VERSION="8.0.0.00141T202311271501L"

cd $HOME/
qnx/qnxsoftwarecenter/qnxsoftwarecenter_clt \
    -myqnx.user $QNX_USER -myqnx.password $QNX_PASSWORD \
    -activateLicenseKey $LICENSE_KEY
qnx/qnxsoftwarecenter/qnxsoftwarecenter_clt \
    -myqnx.user $QNX_USER -myqnx.password $QNX_PASSWORD \
    -mirrorBaseline qnx800-141
qnx/qnxsoftwarecenter/qnxsoftwarecenter_clt \
    -myqnx.user $QNX_USER -myqnx.password $QNX_PASSWORD \
    -installBaseline com.qnx.qnx800/$QNX_VERSION \
    -installPackage com.qnx.qnx800.patchset805/8.0.5.00390T202606231321L \
    -destination qnx/qnx800-141 \
    -cleanInstall
Finally, you can source your QNX toolchain in bash:
cd $HOME/
source qnx/qnx800-141/qnxsdp-env.sh
qcc
If everything is working, the output of qcc should be:
$ qcc
cc: no files to process
Note
You need to source this in any shell you wish to use QNX in. You may wish
to add source $HOME/qnx/qnx710/qnxsdp-env.sh to your ~/.bashrc
CI/CD deployment (QNX SDP 8.0.5)
Note
These instructions are are intended to be run on a x86_64 Linux host only. WSL2 or Lima work sufficiently if needed.
QNX artifacts are built using a ‘deployment’ of QNX which contains a license provided by QNX for our CI/CD.
Warning
This license may not be used for individual development. Ferrocene also has several individual licenses available for developers. To obtain one, ask your manager.
To create the deployment, first, ensure you are using a myQNX account with a QNX Software Development Platform Subscription - Build Server License deployed to it.
Create a deployment containing Linux and Windows toolchains:
LICENSE_KEY="FILL_ME_IN"
QNX_USER="FILL_ME_IN"
QNX_PASSWORD="FILL_ME_IN"
QNX_VERSION="8.0.0.00141T202311271501L"
QNX_WINDOWS_HOST_VERSION="0.0.1.02005T202411230033L"
QNX_LINUX_HOST_VERSION="0.0.1.00135T202311191043L"

qnx/qnxsoftwarecenter/qnxsoftwarecenter_clt \
    -myqnx.user $QNX_USER -myqnx.password $QNX_PASSWORD \
    -activateLicenseKey $LICENSE_KEY
qnx/qnxsoftwarecenter/qnxsoftwarecenter_clt \
    -mirrorBaseline qnx800 \
    -destination qnx/qnx800-141
qnx/qnxsoftwarecenter/qnxsoftwarecenter_clt \
        -installBaseline com.qnx.qnx800/$QNX_VERSION \
        -installPackage com.qnx.qnx800.host.win.x86_64=$QNX_WINDOWS_HOST_VERSION \
        -installPackage com.qnx.qnx800.host.linux.x86_64=$QNX_LINUX_HOST_VERSION \
        -installPackage com.qnx.qnx800.target.qemuvirt/0.2.1.00087T202507241124L \
        -installPackage com.qnx.qnx800.target.driver.virtio.devc/0.1.1.00011T202411230100L \
        -installPackage com.qnx.qnx800.patchset805/8.0.5.00390T202606231321L \
        -destination qnx/qnx800-141 \
        -cleanInstall
qnx/qnxsoftwarecenter/qnxsoftwarecenter_clt \
    -deploySdpInstallation qnx/qnx800-141 \
    -deployLicense $LICENSE_KEY \
    -installationDeployAs qnx/qnx800-141-deployment
Finally, create an archive of the deployment (with dereferenced symlinks) and upload it to the S3 URL which the CI attempts to pull from:
cd $HOME
tar -cv --dereference -I 'zstd -T0' -f qnx/qnx800-141-deployment.tar.zst -C qnx/qnx800-141-deployment/ qnx800-141
aws s3 cp qnx/qnx800-141-deployment.tar.zst s3://ferrocene-ci-mirrors/manual/qnx/qnx800-141-deployment.tar.zst
On CI/CD hosts we use a Python script to setup the toolchain:
cd $HOME
ferrocene/ci/scripts/cache.py retrieve s3://ferrocene-ci-mirrors/manual/qnx/qnx800-141-deployment.tar.zst .
source qnx/qnx800-141/qnxsdp-env.sh
qcc -v
It’s also possible to use tar directly, but it can be problematic on Windows hosts.
cd $HOME
aws s3 cp s3://ferrocene-ci-mirrors/manual/qnx/qnx800-141-deployment.tar.zst - | tar -x --zstd -f-
source qnx/qnx800-141/qnxsdp-env.sh
qcc -v