
Setting up a local development environment
Required software
To develop Ferrocene locally, you’ll need to have the software required to build Rust, as well as the following:
git, as the version control system used by Ferrocene.uv, to manage the environment used to build the documentation. Installation instructions.AWS CLI v2, version 2.9.0 or greater, needed to interact with our AWS account. Note that most Linux distributions only include version 1 of the AWS CLI, while we explicitly require version 2.
x86-64 Linux (glibc) (x86_64-unknown-linux-gnu)
Ubuntu
On Ubuntu 24.10, install the software requirements by running:
sudo apt install ninja-build bzip2 cmake gcc g++ awscli zlib1g-dev
ferrocene/ci/scripts/setup-uv.sh
Note
On versions earlier than Ubuntu 24.10 the awscli package is not newer than
2.9.0, and should not be used.
Other linux distribution
To install the requirements on other distributions, adapt the command for the relevant package manager and any modified package names.
Arch
For example, on Arch Linux awscli can be obtained from the
AUR, and the remaining packages
from the official repositories:
sudo pacman -S ninja bzip2 cmake gcc uv
Fedora
sudo dnf install awscli cmake g++ gcc ninja-build zlib-devel
Apple Silicon macOS (aarch64-apple-darwin)
If you don’t already have XCode set up, get the XCode command line tools as described in Apple Silicon macOS, then use Homebrew to install the remaining dependencies.
To install Homebrew:
/bin/bash -c "$(curl -fsSL https://raw.githubusercontent.com/Homebrew/install/HEAD/install.sh)"
Then use Homebrew to install the remaining packages:
brew install ninja bzip2 cmake awscli uv gnu-tar
x86-64 Windows (x86_64-pc-windows-msvc)
Note
Ferrocene development is only supported on Windows 11 Pro with “Developer Mode” enabled.
If you don’t already have Visual Studio installed, get the build tools as guided
in x86-64 Windows, then use winget to
install the remaining dependencies:
winget install astral-sh.uv Kitware.CMake Ninja-build.Ninja Amazon.AWSCLI
Configuring git
You need to have an SSH key registered in your GitHub account to be able to clone the Ferrocene repository. You can check out GitHub’s documentation if you don’t already have an SSH key configured in your account and your local machine. If you need to generate a new key as part of the process, please follow GitHub’s recommendations to generate a secure key.
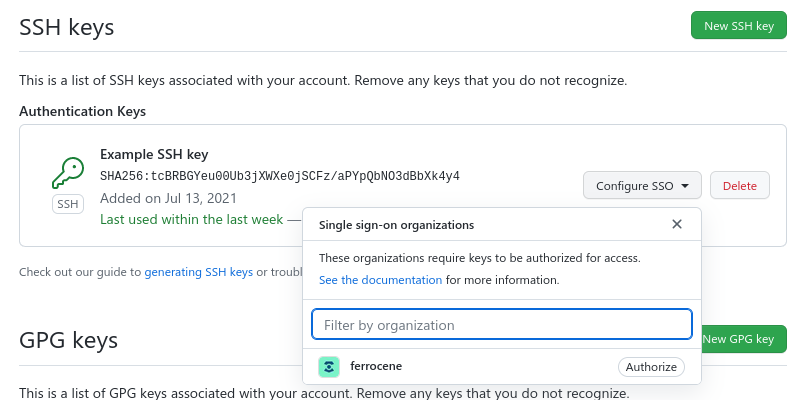
Once the SSH key is registered in your GitHub account, you need to authorize it for the Ferrocene organization using your SSO session. To do so, visit the SSH and GPG keys page of the GitHub settings, and next to the key you use on your work device click “Configure SSO”. Finally, click “Authorize” next to “ferrocene” and follow the prompt to enable the SSH key to access repositories in the Ferrocene organization.
Configuring AWS CLI
Note
AWS CLI is not strictly required to build Ferrocene, only to reuse CI’s build cache. If you aren’t part of the Ferrocene team, you can still build it by setting llvm.download-ci-llvm = false and rust.download-ci-rustc = false in your config.toml.
To authorize the AWS CLI to access our AWS resources, you need to add the
following snippet to the ~/.aws/config (C:\Users\USERNAME\.aws\config on Windows) file
in your work device:
[profile ferrocene-ci]
sso_session = ferrous-systems
sso_account_id = 886866542769
sso_role_name = FerroceneDeveloper
region = us-east-1

[sso-session ferrous-systems]
sso_start_url = https://ferrous-systems.awsapps.com/start
sso_region = eu-central-1
Note
If you do not already have the ~/.aws/config file in your local system,
create a blank one.
If you already have the [sso-session ferrous-systems] block in your
~/.aws/config you do not need to add it again, as only one copy of it is
required.
Once that’s done, you can log into the CLI with the following command:
aws sso login --profile ferrocene-ci
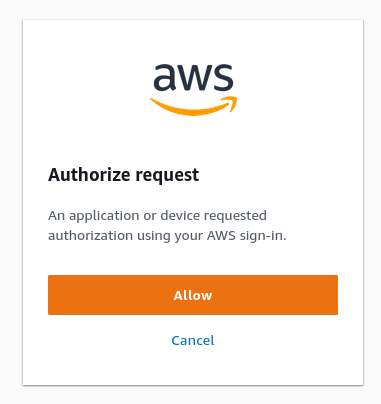
This will open your browser (if that doesn’t happen, click the link displayed by the command). Authenticate with SSO on that page (if prompted) and click “Approve”:
Note
You will need to authenticate with AWS SSO every week. The Ferrocene build system will remind you to authenticate if you’re trying to perform actions that require AWS access but you didn’t log in that week.
Cloning the Ferrocene repository
To clone the Ferrocene repository, you can run this command:
git clone git@github.com:ferrocene/ferrocene.git
This will take a while to complete (as it is downloading the whole history), and
will create a ferrocene/ directory inside the current directory.
Configuring the Ferrocene build system
The Ferrocene build system requires a configuration file to be present at
the root of the repository, in a file named config.toml. You should put this
content in it:
profile = "compiler"
change-id = 102579

[ferrocene]
aws-profile = "ferrocene-ci"
test-outcomes = "download-ci"
coverage-outcomes = "download-ci"

[rust]
lld = true
There are a lot of other options available: you can look at the documentation
for all of them in the bootstrap.toml.example file for further details.
To set aws-profile persistently without having to duplicate it in the config for each
worktree, run export AWS_DEFAULT_PROFILE=ferrocene-ci in your shell startup file (usually
~/.bashrc).
Note
Starting from Rust 1.87, upstream renamed config.toml to
bootstrap.toml, retaining support for the old name to avoid breaking
compatibility. For Ferrocene we recommend continuing to name your
configuration file config.toml: this way, your settings will still
apply even on older branches.